


Facebook Games development using Windows Azure cloud hosting
Probably you have already heard about the term cloud hosting, but I doubt how many of you have understood the meaning of the term. Don’t worry because this is something you realize its benefits only when you deeply step on it.
Cloud Hosting.. what?
Cloud hosting, as its name says, is a web application hosting that works as an infrastructure layer and provides extra capabilities to our known hosting servers. This technology is based on cloud computing which relies on sharing computing resources rather than having local servers or personal devices to handle applications. To do this, cloud computing uses networks of large groups of servers, typically running low-cost consumer PC technology, with specialized connections to spread data-processing chores across them.
But how can that BENEFIT ME?
Enough with the boring Wikipedia-like terminology. How can cloud hosting benefit you? Cloud servers provide increasing capacity and add new capabilities without investing in new infrastructure, training new personnel, or licensing new software. And all these on the fly! These capabilities are paid-per-use and not in the traditional pay-per-package way. What this mean to you is that it gives you the freedom to develop whatever you want, without having to predict its scale, components, or amount of money.
Let’s say that you are building a Facebook application on a cloud server. You can start building your website with a pay-as-you-go plan with a standard database included. Then upscale as you go to almost unlimited disk space if you need to. You can integrate software automatically without the need to customize it. Deploy fast and backup easily. Last but not least, you are able to access your information from everywhere and anytime.
Windows Azure
One of the leading vendors in cloud computing, Microsoft, provides probably the best cloud hosting solution for .NET, Windows Azure. Azure provides both PaaS and IaaS and supports plenty of programming languages, multiple locations and pay-by-the-hour capability. Its best advantage, concerning Facebook development, is that provides SSL protocol by default. This is critical when dealing with Facebook applications because of Facebook’s “Secure Canvas Url” mandatory field.
How to create an Azure-powered Facebook games
Let’s get our hands dirty by creating a Facebook application with the latest tools available. Facebook applications are nothing more than a web application. Moreover, it consisted of a canvas that is linked to your website. So every time the app is called, your web application is hosted inside the canvas.
In order to create our own Facebook game powered by the Azure Cloud we need to follow 5 steps:
- Set up Azure
- Set up Facebook
- Set up our developing tools
- Include the Facebook SDK to our project
- Code it!
Set up Azure
This is the step in which we will create a website for our content. After logging in to Azure press the “+” button on the left bottom corner of your screen and create a new website providing the URL and server where it will be hosted too. It is recommended to use the closest to your users for better response time.
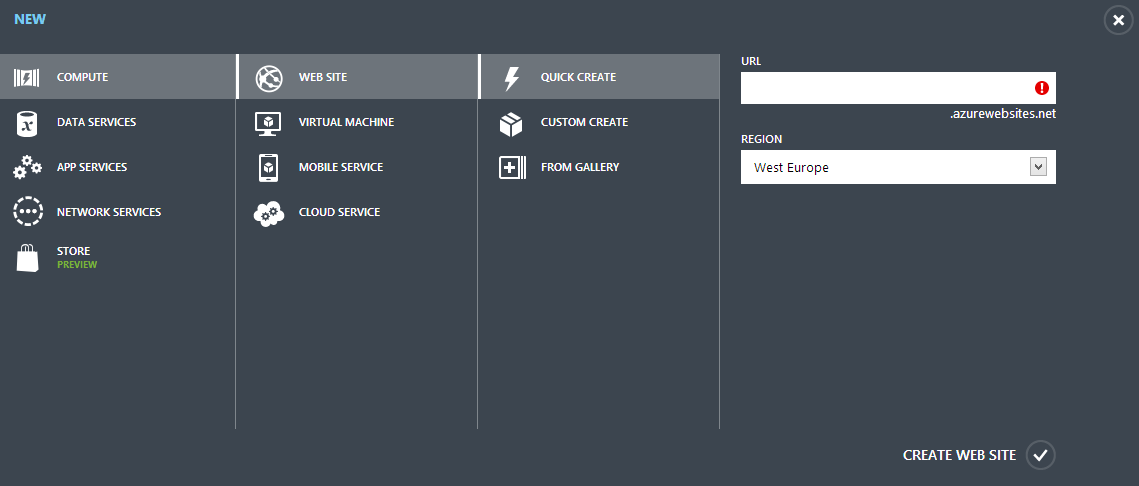
After the deployment, you’ll see the dashboard of your newly created website. That is it! You created a website on the cloud! You can visit your website by clicking on the “SITE URL”.

You can manage anything concerning your website from this page. On the right column, Azure provides you with all the connection credentials that you’ll use in the next steps.
You can also create a new database from the “+” button if your project requires it, but it is currently out of the scope of this tutorial.
Set up Facebook
The next step is to create a Facebook app to host our website. First you need to make a Facebook Developers profile. After you do so, log in and under Apps press “Create new app”.
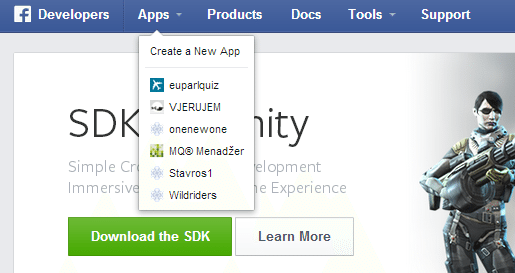
Give it a name and/or namespace (both can be changed afterward) and you’ll be redirected to the apps Dashboard.

On this screen you can see statistics of your app, as well as the App ID, which we will use in the next steps. At this time the app is available only to you. If you want to make it available to anyone, you can change the “Sandbox mode” from “Status & Review” page to “Available to general public”, but it is not necessary right now.
Now is the time to connect our app to our Azure website. Go to the “Settings” page of your Facebook app and press Add platform. Select Facebook app and provide it the “Canvas Url” and “Secure Canvas Url”. These Urls are the url to your Azure website. So if you named your website “MyWebsite” the URL to that is “MyWebsite.azurewebsites.net”
so you should place “http://MyWebsite.azurewebsites.net/” to the canvas url and “https://MyWebsite.azurewebsites.net/” to the secure canvas. Hit save and now you will be able to see your apps’ Url under “Canvas Page”.
*(If you navigate to your app page you will probably get an “invalid method (HTTP verb)” error.
This is because Azure creates a “hostingstart.html” file for your newly created site which doesn’t support GET, POST methods. You can change the filename from “.html” to “.php” or just wait until the end of this tutorial.)
Set up our developing tools
Now that Azure and Facebook are both set up we just need to configure our working tools. There are no other but the tools that will help us work faster and efficiently. I suggest working with Visual Studio and setting up a git repository. This will help you deploy faster than old fashioned FTP client – way and backup every time you deploy. A very good git hosting server is Atlassian BitBucket and a git client like Source Tree works perfectly with it.
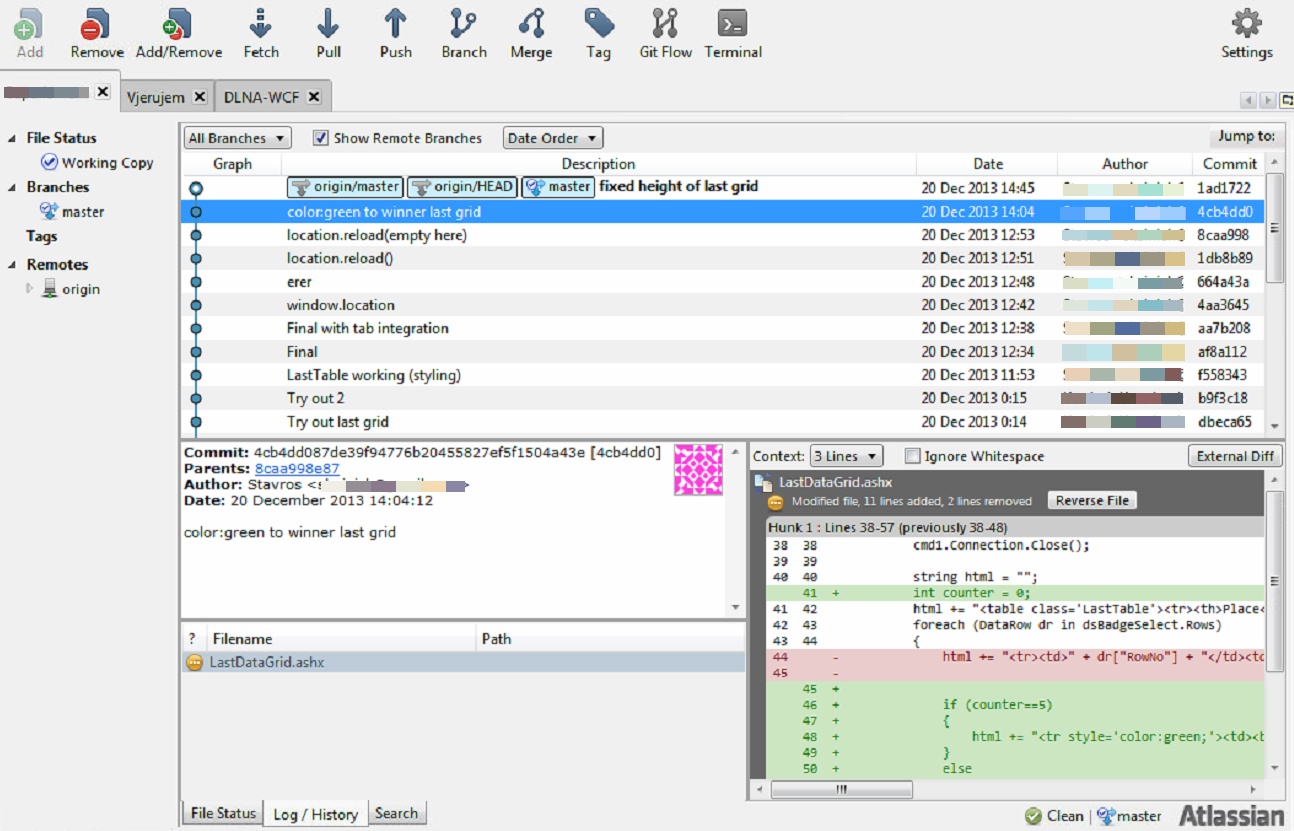
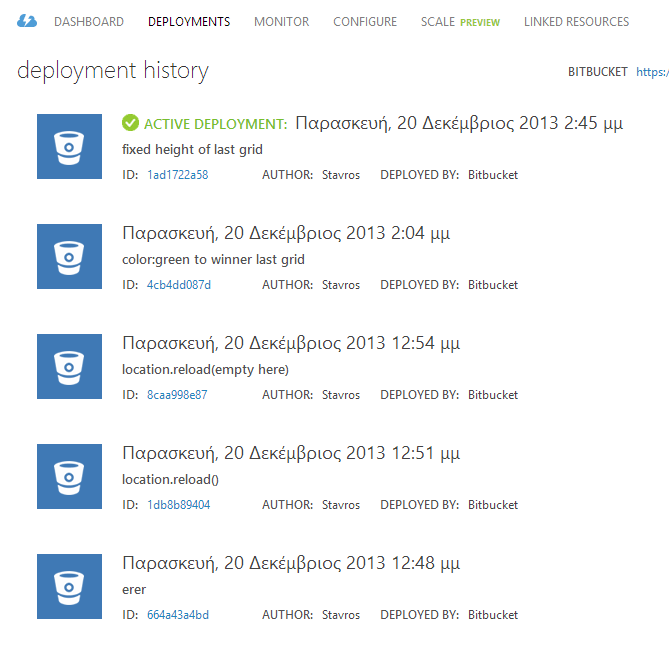
Then from your Azure’s Dashboard you can set the server to use the git repository.
Include the Facebook SDK in your project
If your application needs to perform actions in the Facebook open graph, then you need to have access to the Facebook API. In this section we will integrate the Facebook SDK to our project to do so.
Open your Visual Studio or your editor and place this part of code right under the <body> opening tag of your file.
FB.login(function (response) {
                if (response.authResponse) {
                    //Place code here to be executed after the login is successful!
                } else {
                    console.log('User cancelled login or did not fully authorize.');
                }
            }, { scope: 'email,user_photos,user_videos,publish_stream' });
Now replace the “YOUR-APP-ID-HERE” with your AppID that the Facebook developers provide you on the Dashboard screen.
Code it!
In the last step I’ll guide you through the very basic steps on dealing with the Facebook graph.
Before you access any user data you must first grant access to one’s profile. This is done through the FB.login function. Place this part of code to a button event or in a random place inside your code for an automatic login when the page is loaded.
    <script>
        window.fbAsyncInit = function () {


            FB.init({
                appId: 'YOUR-APP-ID-HERE',
                status: true,
                xfbml: true
            });


            FB.Canvas.setSize({ width: 760, height: 2300 });
        };


        // Load the SDK asynchronously
        (function (d) {
            var js, id = 'facebook-jssdk', ref = d.getElementsByTagName('script')[0];
            if (d.getElementById(id)) { return; }
            js = d.createElement('script'); js.id = id; js.async = true;
            js.src = "//connect.facebook.net/en_US/all.js";
            ref.parentNode.insertBefore(js, ref);
        }(document));

    </script>
This will pop up a Facebook window that will prompt the user to log in.
It will also notify him about the actions that may be performed to his profile through your applications. These can be declared on the code “scope” section above.
On this example we enable our application to get access to the user’s email,photos and videos as well as we are able to publish on his profile.
Now we can access the user’s graph wherever we want inside our code. A simple call to the graph is as follows :
<div id="Info"></div>

<script>

function getUserInfo() {
    FB.api('/me', function (response) {
        document.getElementById("Info").innerHTML = "Hello" + response.name + "<br />Link:" + response.link;
                userID = response.id;

            });
            }
</script>
What we did here is that we called ‘/me’ on the Facebook graph, which refers to the logged-in user, and we processed the response content like name, id and link.
Conclusion
With that part done you already built a simple fully functional Facebook application powered by Azure cloud hosting! If you are an experienced developer that process didn’t take more than 20 minutes and this is one of the great benefits of cloud hosting.
Your app is up and running fast and efficiently ready to scale up at anytime.
There are much more things you can do to enrich your applications through Facebook Developers documentation and Azure documentation which are great learning resources to scan through. Also If you plan to develop a game I strongly recommend you to try out the HTML5 Canvas Javascript framework, KineticJs. This a very powerful javascript engine for animations and any kind of image manipulation through the canvas element.
The Greek connection. When not skiing you can find him on his Yamaha hog